March 15, 2011
Use Technology To Improve
Your Scratch Building Projects
Another Ides of March has arrived and still no sense of foreboding felt the Romans who triggered the phrase as a warning to Caesar from soothsayers who apparently knew something he didn’t.
It is probably a time we all wish we had a soothsayer.
But having pre-knowledge of the results is not always favorable in the world of scale modeling. If we knew a project was doomed from the start, would we ever start it? Scratch building is a good case in point. We need the sense of adventure which comes from knowing we don’t know exactly how a structure or vehicle model is going to go together.
Many times when I am involved in a structure build there is a hankering towards trying to find a set of plans but the idea of modeling without a safety net soon wins out.
I find building structures the way I wish gives me the opportunity to push the envelope in design making each project unique.
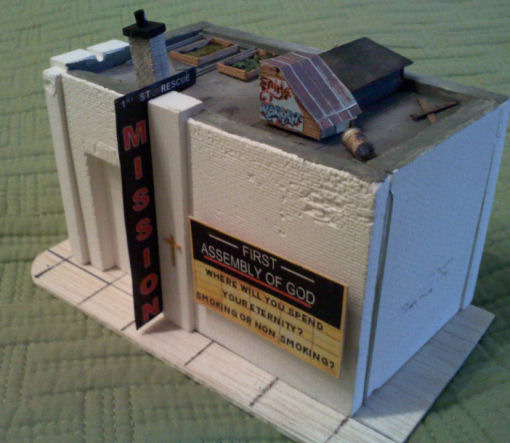
This is my version of the Downtown Deco "Rescue Misson" which will be featured on the Diorama underway in the article below.

Diorama Building To Fit
Your Creative Budget
Planning a diorama takes into account a lot more than an assessment of your existing completed models that happen to fit the same scale.
First, you need a concept, a central idea for the diorama’s creation, how and where it is to be displayed and if you have the available space. About this time, you want to come up with a theme that will allow you to put in days, even weeks to complete your miniature scene.
Once you have nailed down the space requirement and have formatted an idea of how you want to present its theme, it is time to come up with the models you will use and map out the scene.
So how does this fit real life? Funny you should ask because I just started my latest diorama and the planning is still fresh in my mind. I wanted something different. Maybe not original, but something not easily Googled.
Google “Lazy Susan Diorama” and you won’t come up with 100 hits, not even 25. I have a small space which provides only one viewing angle, so being able to spin the base makes sense.
I chose for my subject, “The Other Side of the Tracks” to help remind myself and others who happen to view this scene that there is a harmony to be found that allows for education and understanding by dignifying those who are perhaps at their worst, yet have learned to cope.
“There but for the Grace of God…”
Another element of my project involves design. A lazy susan diorama doesn’t have a back where to can stash you mistakes. It has to make sense when viewed from any angle. That brings into play a design maxim I had almost forgotten, “Think in terms of three”.
Taking in the scene as a whole, there needs to be a sense of order other than modeling three buildings and calling them one, two and three. There needs to be a pecking order which allows the viewer to get a sense of poverty without having to tour a slum area.
Remember,
the poor and needy are not helpless, the Lord takes thought(of
them) and plans for them. Psalm 40:17 The
impact of volunteerism in slum town
Life
in an alley between a bar and a pool hall
These are three messages I wish to convey with my diorama without having to print out signs.
It is certainly strange the writing of this article would coincide with the tremendous crisis taking place in Japan and is still uppermost as you are reading this.
I have been struck, not so much by the tragic scenes unfolding, but the unfaltering good will and hope expressed by the Japanese people sharing their food with others (even those more fortunate then themselves) and the complete lack of looting and vandalism in the face of catastrophe.
There are three primary directions to consider: vertical, horizontal and front to back. They constantly change as the diorama is spun.
The diorama must visually relate to all such differing aspects at the same time.
Having built a number of structures for model railroad layouts, I am well aware of the importance of rooftop detail. Since it is the first part of a structure model seen and the one that creates a lasting impression, the rooftop must be considered a main focal point.
As a case in point, I built the Downtown Deco “Rescue Mission” as one of three structures for the lazy susan with particular attention to the rooftop. In addition to the almost expected roof access hutch and a pigeon coop, there is a rooftop garden where Mission volunteers can grow vegetables.
The back of the Mission building is overgrown with ivy running up the wall. Nearby is a homeless woman with a possession-laden grocery cart.
I was hoping to have the diorama finished by mid-March, but as always, “the best plans of men, how often gang aft agley.
In other words, no matter how well you plan a project “stuff happens”. Relax and get over it, it isn’t the end of the world…yet.
Scale Modeling on Two Fronts
Lately, I have taken to working on two modeling projects at the same time as it facilitates use of my available time, tool availiability and more importantly, allows adeqaute time for drying adhesives and paints.
Up until this point, I have been trying to speed up the drying process to get more modeling in. I worked, but quality went out the door.
Now when I need to let adhseve dry, I set the project aside and switch to an alternate.
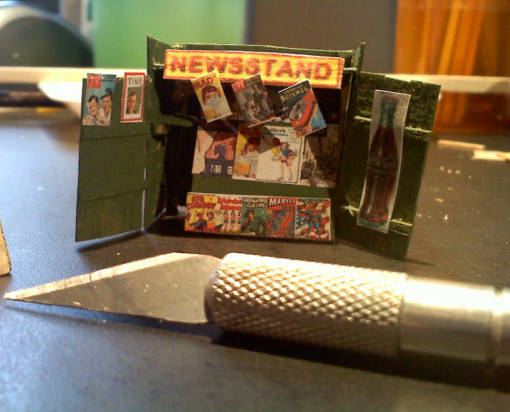
In this case, I am getting started on a scratch build of one of my favorite Fine Scale Miniatures, Stuffy's Brewery. I am beginning at the tavern end.
Here is my version of the Newsstand with magazines and newspaper from the 40s and 50s.
Plastic Models: Getting Off To A Good Start
So, you got a brand new plastic model kit ship with a gazillion pieces and you want this one to come out good enough to display on the mantle. Now where do you start.
You’ll be a lot happier if you deal with the manufacturing imperfections before you begin your creative work. When you open the box you will undoubtedly find the plastic parts large and small molded onto trees and in plastic bags.
1. Inventory your kit with two objectives in mind; making sure all parts are present and observing the overall condition: note all the flaws the parts have – mold lines, pin holes, sink and swirl marks, warpage, and flash,
2. Deal with any issues from the first step. If you need parts, contact the manufacturer and expect a delay for delivery. Most manufacturers will help you deal with missing part issues. If you need to correct flaws, do it now before doing any painting or removal from the trees,
Mold lines: these are very small raised lines on hull pieces, running along sides of a mast or over raised portions. Some are more pronounced than others. The more recent plastic kits have been improved and, you will have hard time finding mold lines. They are easily removed with fine sandpaper or sanding sticks.
Pinholes: you will find these small round holes in the plastic, caused by the pins that push the part from the mold. In newer kits these marks have been eliminated or are in concealed spots. Try test fitting the parts to see if the pinhole(s) can be hidden. If so, sand the surface smooth. If it is deep enough, fill it with putty or body filler, and then sand smooth once the filler is dry.
Sink marks: most are depressions in the plastic flat surfaces like decking caused by plastic shrinking while it’s cooling. They can be any shape or form. These should be filled and carefully block-sanded before spraying primer. Flash Its the most common defect on plastic parts (especially those produced on old tools), but it is easily fixed. Just cut off the flash with sharp hobby knife, and sand the rest with sandpaper, sanding stick, or needle files.
Warpage: this occurs when hot plastic parts are dropped into a box and deformed under their own weight or weight of other parts. Basically, it’s a part that has wrong shape or is twisted. If the warpage is minimal, you can try to fix it with hot air from the hair dryer. Warm the part by blowing hot air on it, and carefully and slowly bend it into correct shape, then wait till plastic cools off. It should hold new shape.
When the body is seriously warped, you can try the following (and this is not recommended for children under 14 or should be supervised by adults) method: boil some water, take it off the fire, and let it sit for few minutes. Then briefly dip warped part in the water, and quickly remove it. Then bend it to shape, and hold until plastic cools off.
Safety Note: Keep in mind that after you pull the part out of the (almost) boiling water, it will be extremely hot. Please wear gloves or other hand protection while handling the part.
Your Help and Ideas Needed
To Expand SMH Idea Base
 Making daily decisions involving
www.scale-modelers-handbook.com
for the past 45 months has led to the creation of over 425 pages of articles on the various facets of scale modeling, this monthly e-zine and a host of modeling questions answered.
Making daily decisions involving
www.scale-modelers-handbook.com
for the past 45 months has led to the creation of over 425 pages of articles on the various facets of scale modeling, this monthly e-zine and a host of modeling questions answered.
As we get ready to embark on our third year, I am hoping to open the site up to input from other scale modelers. You may have noticed the Navigation Bar has been sub-divided into the major hobbies covered.
Each of these sections now has one or two pages that invite participation with questions, tips and pictures regarding your various modeling endeavors.
We want to hear from you as do the other 25,000 modelers who log onto this site monthly.
As I get ready to roll into my 71st year, I can’t believe how much I have learned about hobby activities In the past two years. I have heard from other modelers with similar experiences.
To help me develop and maintain
my website
your comments on its content are essential. You can send me your comments by visiting the “Voice Your Opinion” feature at the top of the Navigation stack in the left column on each page.
It was never my intention to make this website a one way street as my knowledge is no where deep enough for me to be termed an “Authority”. I hunger for your feedback, comments, ideas, tutorials, plans, pictures and even your negative comments if considered constructive.
The Internet and that includes
www.scale-modelers-handbook.com
work best when they are interactive and that is collaboration only you can provide.
It has been a pleasure serving as your guide for these past two years and by no means am I throwing in the towel, for I honestly believe the building and maintaining of this website are instrumental in keeping my mind active.
I want to open up this site in the fast lane. That is your part of the two-way street.
If you have been giving some thought to launching your own home business in 2010, it is worth your time to take a look at what I found:
