
December 17, 2007
Christmas Crash Stops The Presses
Sorry for the delay in getting this issue into your hands...A funny thing happened on the way to the computer.I've experienced about everything you can think of getting this newsletter out. This issue has been the capper. My computer has crashed four times in the last three days while I have been writing this eZine.
I am not going to risk it again, I will go with what I have got now and hope that my next month I'll have this computer problem licked. My apologies for the briefness of this communique, but with Christmas 8 days away, we've probably all got better things to do. Merry Christmas, I'll see you next year.
|
|
It is obviously a buying medium where you have to take care, make sure you know the item you are looking to purchase and knowledgeable about pricing. On the other hand, it is foolish not to search eBay when you are considering a purchase. So, if your spouse has computer phobia, now is the time to make it easier for all family members. |
Putting Up A New Front; Customize With Awnings
You can customize (and add depth) to almost any wall surface by providing windows with overhanging awnings, air conditioning units and fansThe traditional canvas awnings on ground floor windows sheltered sidewalk produce and merchandise racks, and shaded storefront windows — a welcome relief in hot weather. Today, modern, fixed-frame awnings are more for style than for function.
But just like you can use a computer to produce wall materials for such buildings, the same computer and printer will help you "sew" up your own miniature sets of awnings.
Making traditional canvas awnings is easy using a computer with a painting/drawing application and a printer. Typically, they had alternating wide color stripes (usually off-white and another color). They can be printed on regular thin paper and cut to fit. Leave the edges straight or add scalloped or pointed edges using pinking shears or scissors that cut patterns (available at craft and scrapbooking stores) for extra detail. Cement them to the front of your buildings by edge-gluing them, or leave a small gluing tab underneath. Canvas awnings usually extend 5-10 feet from the wall.
Making fixed-frame awnings is a little trickier. If they're angular, print them on cardstock or laminate printed graphics to thin sheet styrene, this way they'll hold their shape. Cut them out and fold the ends. Leave gluing tabs or edge-glue them to your building wall. Umbrella (rounded) awnings can be made out of painted, vacuum-formed plastic spheres sized just larger than the width of your window. In some scales they’re also available as castings that can be attached to building walls.
Adapting Rocket Tool To Structure Modeling
Figuring a Cone's ArcHere's a handy tool you can use to figure the flat arc needed to produce a conical shroud, for instance the round, cone shaped roof of a water tank.
Another us is figuring the curve of a transition for one size rocket tube to bigger diameter tube.
Both can be figured using the online javascript application.
It will work with any dimensions and any units or measure.
You can either download it for use on your own computer, or bookmark it for online useage.
Either way, it is a handy tool to have access to:
Cone Arc Maker
Chalk It To Age It
Start off with pastel chalks like burnt orange, umber, browns and blacks, grays and you will need white.You will need to reduce the sticks to dust. Use a blade and scrape it across the length of the chalk onto a piece of copy paper.
The handiest storage container I've come across is the week-long pill organizers. Each box is labeled S,M,T,W,T,F,S) Under each letter put enough chalk dust to cover the bottom of the colors you use most often.
Pick up a tall can of Matte finish spray from your craft store (it is more economical than the little Dullcoat cans), and works just as good to cover your chalked weathering.
Getting Mortar Bored
To really look realistic your brick buildings need mortar.Most manufacturers turn out a pretty accurate scale bricks in their sheets, but that is where the detail ends. Take a look at a real brick wall and you'll find there isn't much duplication. Some are scratched, some are chipped, many have a cross-hatch of gouges or scratches. Simulate these by dry brushing with a black wash (India Ink or black leather polish).
But the final touch mortaring, will have the most profound effect. I learned this from a Ken Sproranza clinic on weathering.
You'll need a bottle of sand-colored water-base paint as well as a dark gray; Both are mixed with denatured alcohol and often for use on the same wall section.
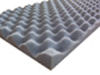 For a cheap, one session applicator, stop by your favorite electronics store and ask them to save you some packing foam (fine, 1-2-inch gray sheets). My favorites are the reverse egg carton looking used to pack sensitive electronic parts.
As needed, I cut off one of the nodules to provide a hand-held sop. Dip it into the paint mixture and rub across the brick surface. The next step is to wipe it from the brick faces, I prefer to use my finger for more finite control.
Fingers work good for this purpose as they don't dip into the mortar lines and swab out mortar and cleanup is real easy.
Sweet and Sour Aging
Here's A Use For Your Old Pill Bottles
Strip off the Prescription label and it probably would be a good idea to rinse with hot, soapy water and dry for a new purpose.
Now raid the kitchen cupboard for the vinegar bottle (diluted to 5% acidity) and fill your med bottle to within an inch of the top. Now drop in a half pad of 0000 steel wool and set the bottle aside for seven days.
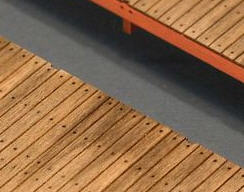
After the week passes, pull out the strip wood you want to use for your next wooden building project. I find it actually works better for me to cut it into lengths about twice the height of the bottle. You'll also want a piece of glass that will allow you to layout all the wood you will be working with to keep it from overlapping.
I've used both methods either dipping the sticks in the solution or swabbing it onto the glass surface where I lay out the strip wood.
The glass and solution will create an adhesion that will help to eliminate any warping that might be caused by wetting the wood.
Let the wood dry. I use a second pill bottle to stand the stripwood on end for drying. If you are in a hurry, use a hair dryer set on the highest setting and begin to dry the wood. Continue drying the wood until it blows off the glass. The wood surface not touching the glass will take on a light red tone.
The side of the wood next to the glass takes on a steel-gray appearance. If you want it red repeat the process with the steel-gray side away from the glass.
If you want a darker tone repeat the process as many times as you need.