
|
Modeling Interior of N-Scale Mill Challenging Scratch ProjectAt least that’s the way it works in my N Scale model. There is no one making reasonable facsimiles of grist mill equipment in N Scale so I was pretty much on my own to design and scratch-build the details.
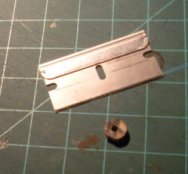
The Weimer mill comes with material for booth the first and second floors, my junk box came up with the third. I assembled the left, right and rear walls held together by the first floor and glued them into place using Titebond and let it set overnight. The first floor was home for the milling stones, two stones, four-feet in diameter weighing in at about 2,500 pounds with a hole in the center. Four foot in diameter in N Scale is roughly 5/16ths of an inch. Funny, that’s just about the size of a wooden pencil. I wonder…
I knocked my crane together with N Scale 6X6 pieces and a small piece of spring wire I bent around (you guessed it, a pencil to form the arch used to pick up the stone from the tub and swing it into a vertical position for dressing. The millstones are fed a steady stream of grain from an upside-down pyramid-shaped hopper. I emulated this in N Scale by doing a four-way sand on a piece of quarter-inch stripwood and lopping off a piece about 5/8ths of an inch long to act as the bin which I placed in a make-shift shaker (actually an N-Scale window with the mullions removed).
This assembly is mounted above the tub under a spout coming from the floor above. The only other items on the first floor are the retail bin where the final flour is stored and the bran chest. These are made from stripwood. A set of stairs on the left wall connects with the second floor.
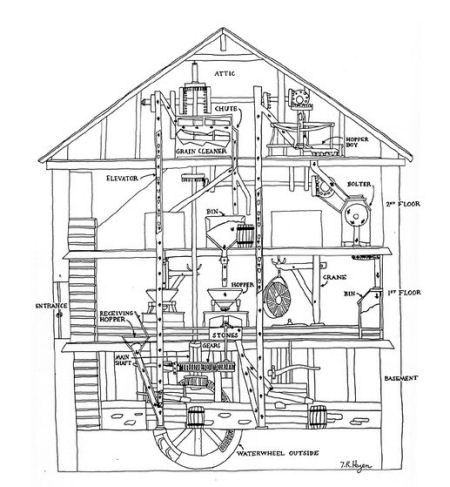
This cross sectional drawing illustrates the interior of a typical grist mill. All of it won't fit in my model. I am simply trying to create a reasonable semblance. From this point I kept the second and third floors unglued to ease location of objects and to better serve the inter-connecting elevators and power shafts (spindles) which go straight from the basement to above the third floor. The elevators were square tubes which contained a moving belt carrying a series of cups that ran through the grain where they were filled and then taking them to the top of the mill where the grain was cleaned before dropping onto the bin above the mill-stone’s hopper. The trick in N Scale is to get the elevators (4X4 stripwood) straight. Start by drilling holes about an inch apart in the third floor sheet using a pin vise. Insert your piece of stripwood and tip the end of it with black from a “Sharpie” pen Drop it straight down onto the second floor where it will leave a black mark. Do this for both holes. Drill the same-sized holes on the black marks in the second floor and repeat the process to mark spots for the elevator bases on the first floor.
Before setting the elevators and the power spindle, finish furnishing the second floor, predominately with a bin which feeds the hopper above the millstones on the first floor and the bolter which separated bran from the finer flour by shaking it over fine mesh or “silk”. They flow down tubes to their separate repositories.
Revealing the interior of this grist mill will rely on a removable front wall and a removable roof for visibility purposes but the first floor will require an alternate light source. I recently ordered an Electroluminescence Experimenter’s kit from Miller Engineering in Connecticut.
Now it was timed to experiment.
The EL lights give off virtually no heat so they are safe for use in confined spaces. For my application, there are two floors which need lighting to feature interior details like millstones, wooden cranes and elevators. Each area measures .75X 1.5 inches. With furnishings, there is very little room for even a grain-of-wheat bulb, but plenty of space for a strip of EL.
|
|||||||||||||
 This is fascinating material The EL sheet is 1.75 by 2.75 inches with 8 sets of electrical connectors on the edges. They actually consist of a layer of phosphor sandwiched between two conductive layers, the front is transparent so the light only shines one way. It is powered by two AAA batteries and has it’s own slide switch. The application ideas are almost endless; lighted billboards or building-top signs, illuminated display panels for model cars, planes which have dashboards, the blue warp glow for a space ship, safety lights for joggers and cyclers, even a lighted lapel pin.
Modeling Resources


All Four and Save