
|
Cheesebox-On-A-Raft
|
||||||||||||||||||||
 The U.S.S. Monitor was the Union’s response to the Confederacy’s construction of the ironclad Merrimack (CSS Virginia) in the American Civil War.
 The two ironclads would later fight to a draw in the world’s first battle of two vessels made of iron.
Henceforth, the navies of the world began phasing out the era of wood and sail and turn to constructing ships of iron and steel.
Just last month the $30 million Monitor Mueseum in Newport News, Virginia opened for the first time.
| Construction Pictures | |
 |  |
| Circular Base | Brass Segment |
 |  |
| Brass Rods | Cannon On The Lathe |
 |  |
| Comparing Cannon Barrels | Milling Cannon part |
 |  |
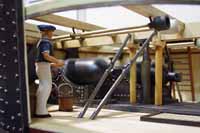
| Cannon Carriages | Wood Strips Pinned to Metal |
An acquaintance of mine had done a fine job making the Verlinden model. I took several photos of it and decided to make one out of wood and metal. I had originally decided to make it twice the size of the Verlinden kit, but after figuring the size of the brass rods I would need to make the Dahlgren cannons, I decided to make it 150% of the size of the Verlinden kit.
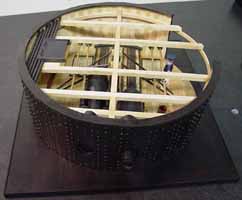
I bought the resin kit, took measurements and tried to find what information I could on the web and in libraries. When all was said and done, my model weighed in at 20 pounds, most of which is located in the two massive cannon barrels. I made the turret so it revolves on a small section of the Monitor’s deck that I added. Needless to say, the ladder, the blocks (with sheaves), the gratings, the floor planks (with trunnels) the mechanism parts to swivel the turret, the buckets, the cannon ball racks, the Dahlgren carriages, the cleats, etc. were all made from scratch. The scale is 1/24.
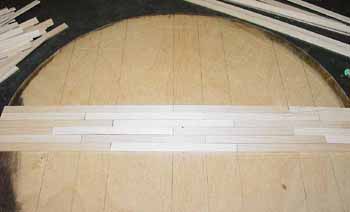
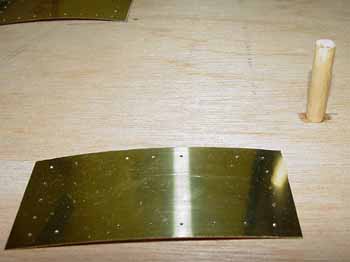
· I made the turret’s circular base out of plywood and planked it with basswood planks (photo 1). I bought a supply of coiled brass sheet that I could use for the metal sheathing for the side of the turret. I decided to have the turret sit and swivel on a small portion of the Monitor’s deck, so I cut a square section of plywood and secured a wooden dowel in the middle. This square section was covered with brass plates that I had cut (photo 2). All the brass in the model was darkened with Blacken-It and then sprayed and sealed with a matte finish.
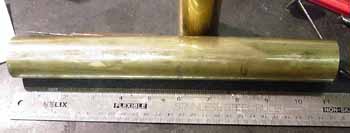
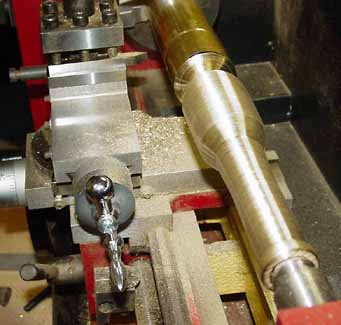
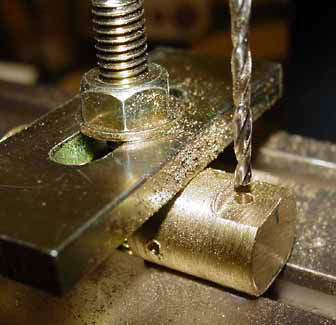
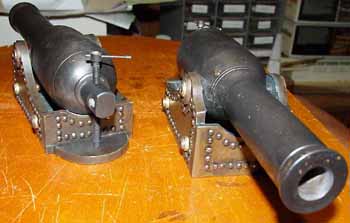
· Now it was time to turn the solid brass rods to make the Dahlgren cannons. It turned out that if the brass rods had been any bigger I would have not have been able to mount them on my lathe (photos 3a and 3b). After some time and effort I had two very heavy cannons made. Each massive cannon barrel weighed 7 pounds when finished (photo 4). The back attachment to the cannons were milled and drilled in my Proxxon milling machine (photo 5) and then glued to the main cannon barrel. The carriages to mount the cannons were made out of wood and then covered with brass plate segments. I used brass brads to simulate the rivets (photo 6). These same brass brads were used for the rivets on the outside of the turret.
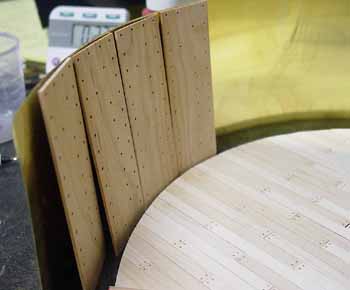
· For making the sides of the turret, I cut a length of the coiled brass that could wrap around the circular wooden base of the turret. I then used contact glue to attach segments of wood to the inside of this brass (photo 7). These wood segments had been drilled as to where the rivets would be located. I then used contact glue to add brass segments to the outside.
· The rivet openings were then drilled through the brass. The rivets (brads) were added. This (the sides of the turret) was then glued and nailed to the turret base. I then glued two more wood panel rows to the inside of the turret. To make the friction bars inside the turret that the gun carriages would slide on, I used rectangular pieces of brass I had purchased (photo 8). The sole figure on the model was made of wood, with the exception of his arms and head, which I got from a car mechanic figure.
· The lifting mechanisms were made from brass tubes or milled pieces of brass (photo 9). An empty turret can be seen in photo 10. I decided to leave an opening in the side and to only put a small portion of the roof to allow for better viewing. After all items were made it was a matter of putting everything in its place and stepping back to see what I had done.
If you would like more information on how I made this model, feel free to contact me at guzmanshipmodels@gmail.com or see my website at www.guzmanshipmodels.com for more completed photos of this model and others I have made.

SBI!
