Duplicating Sub-Assemblies Means
To Improving Modeling Techniques
Obviously there are N-scale buildings with a lot more than 13 windows but when you are working with a laser cut structure with four-piece windows even a Baker’s Dozen can present a challenge and there are a few things you ought to look out for.
You will soon learn, (if you didn’t begin with the knowledge) that model kits come with exactly the right number of pieces, no more, no less if the windows call for 52 pieces, that’s what you get. Thankfully, most laser kit producers will send you replacement parts (the entire sheet) for broken or missing parts, even lost parts.
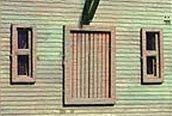 Tip 1. Keep the pieces off the floor—When you are dealing with window frames no bigger than an eighth of an inch square with stiles and sashes less than a 32ndth of an inch wide they easily manage to disappear from the face of the earth in a fall from the workbench to the floor. Seldom do I find the dropped pieces and that means putting things on hold until the new mailing arrives.
After losing 3 such tan frames in the confines of a tan carpet (I called and ordered a back-up sheet) I decided a shirt was needed. I use a dark-colored shirt and mate the shirttails to the metal bench legs with magnets loosely tie the arms around my waist. I haven’t dropped a frame since.
Tip 2. Use a Razorblade, not an Xacto knife—Individual window and door parts are held to the sheet by a couple of tabs that need to be clipped. I N-scale the slot around the frame is more easily negotiated with the thin blade yellow mini-razor scraper. Once cut free I pick up the window frame with tweezers and sand it against an emery board to remove the remnants of the tabs.
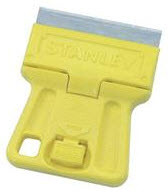
I have found this little yellow razorblade holder to be handy for so much like slipping the backing from the adhesive on small parts. I slip the blade between the wood and the backing material and once separated, I press the sticky surface to the blade while I peel away the backing with tweezers.
This keeps these tiny, delicate pieces stuck to the blade where I can find them. Not a big deal until you multiply it times 52 pieces that must be removed from the backing material.
Tip 3 Keep it simple—The idea of working with the adhesive that comes on these detail sheets has often touted as ineffective because the adhesive itself has little tack and is not very resilient. O contraire, I have found it much more effective than trying to apply glue to these pieces (think 52 again). It is the same as any other adhesive when you apply pressure and let it sit overnight.
Tip 4 Make ‘em dirty-- These kits usually come with clear plastic window material which means shiny, clean glass out-of-place in an old mill or factory. Instead, I opt for cloudy plastic made by doubling adhesive tape to itself with a slight overlap. I use the overlap to stick the “glazing” to my bench and then use tweezers to place the outermost window frame squarely onto an edge of the adhesive tape. Then trip with, you guessed it, the mini-razor scraper.
<


