BasicsPlan Of AttackModels That MoveModel RailroadsModel ShipsStatic ModelsPeer To PeerLinks BelowNeed More Work
|
Ship Planking Tips Get You Off
To A Good Start
| The majority of us cut our scale ship modeling teeth on European models and learn the hard way of the inaccuracies and exclusions of these kits after spending anywhere from $100 to $1,000 for the right to try. Before spending the money for such a kit give the overall process some serious thought. Know that you will spend hundreds of hours straining your eyes, squeezing and curling your fingers to the point of cramping and frustration in dealing with the lack of perfection. |
| As you go through these experiences it will help to have a positive goal in mind, something like:
There, finished at last. It is a thing of beauty worthy of the time and effort I have put forth. This model has been born of my own hands and delivered with my skill set. This ship model will be on display for all to see and admire. I alone know of its flaws, (whether mine of the manufacturers) and I am under no obligation to confess their existence to anyone. |
Ship planking Tools You'll Need
 | | Tips For Planking Your Model - Depending upon the model manufacturer, you may find the plans contain limited or inaccurate instructions. Hopefully this is offset with an abundance of pictures and/or drawings to guide your efforts. But before getting to far beyond an inventory of the parts, do some research on the model, its manufacturer and the experiences of others. You can do this through books, the Internet websites and modelers’ forums.
- Build on a solid base. Start by building a jig that will clamp the keel. This will insure the correct installation of the bulkheads.
- Install the bulkheads starting from the center and alternating between front and back until all are in place. They need to be 90 degrees to the keel and 90 degrees to the base of your jig. Let the glue between the keel and bulkheads dry at least overnight before proceeding.
|  | - Wrap a piece of medium sandpaper around a block that is long enough to span three bulkheads and use it to true the lie of the bulkheads from bow to stern. It needs to make contact with at least three with each stroke. You can check your progress with a plank making sure it lies flat along the full length. This may call for material removal and in some cases filling low spots with shimming material.
| | - Pay close attention to the degree of canting (estimated canting angle and tilt direction are in agreement with the model’s plans) of the bow and stern areas of the hull.
- To begin the planking process, divide the lower hull of the ship into sections with planking belts to create smaller open areas. Planking belts consist of two or three planks set two to four to the entire expanse. Once the belts are in place and smooth, it is easy to maintain the smoothness through out the section (without kinks, bumps or wrinkles).
- Belts are not used above the main wale of the ship as planking in this area is parallel to the deck’s surface.
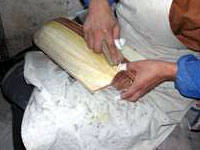
| - Bending planks for the hull is best accomplished before applying them to the bulkheads. Wood can be bent easily if it is wet or hot or both. Simply soaking a strip in water will make it more pliable. Hot water works better than cold.
- Use a Cyro-based glue (Krazy Glue) where curvature of the planking is severe and on the opposite end. Elmer’s Wood Glue elsewhere.
| 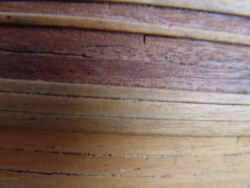 | | | Closeup of hull section of my HMS Beagle | | The important thing is to work one plank on each side of the hull at a time. Once the planks are fastened to the bulkheads or inner hull, their environment is different from wherever you were storing them. They change shape and will try to straighten back out. | |
|
|
|